Home » Resources » How-to Guides » Dataverse & Dynamics 365 Installation Guide » Duplicare Hub » Duplicare Installation Guide » Prerequisites
Duplicare Prerequisites
Prerequisites
Before installing the Data8 duplicare™ solution, please complete the following list of prerequisites:
- Online or IFD
Your Dynamics 365 instance must either be hosted by Microsoft (with a domain name ending in dynamics.com) or be configured for Internet Facing Deployment (IFD). This guide will be tailored towards online integration. - Version
You must have version 8.1.x.x or higher. To confirm your product version, when you are in a model driven app, click on the gearwheel icon in the top right corner of the Dynamics screen and click About. - Data8 account
You must have a valid Data8 account. Please register at https://www.data-8.co.uk/ if you have not already - Registered CRM connection
We need to be able to connect to your CRM for the duplicare™ solution to work correctly. Please enter your connection details at https://www.data-8.co.uk/Dashboard/CrmConnections - Assign Privileges
When registering your connection, you will be given an option of using either a user account or an application user. Please assign the relevant security permissions to whichever user you have opted to use.At minimum we will need the duplicare administrator role and the system customizer role to help us configure. On top of that, we will need relevant permissions to perform the actions you want us to perform (i.e. if you are merging accounts, we would need all permissions associated with that – not only in account but in it’s child entities etc). Generally, if you’re looking at granular permissions it can take some time to get them right which is why we always prefer system administrator. If our systems do fail with missing permissions though, we will get in touch and let you know what we are missing.
Once you have met these prerequisites please contact your Data8 account manager to apply your duplicare™ license to your account.
Solution Installation
Note: If you installed the solution from AppSource then this step will have been completed for you.
You will have been provided with a zip file containing the duplicare solution. To install it, open https://make.powerapps.com, ensure you’re in the right environment in the top right of the page and navigate to “Solutions” on the bottom of the left navigation bar.
- Click “Import” and select the zip file you have been sent, and then click “Next”.
- Click “Next” again and the solution will be imported.
- Click “Close” and the solution has now been imported.
- Make sure to “Publish all customizations” for the changes to take place.
Configuration
All configuration for duplicare can be completed in its own model driven app.
When installed, find your list of “Apps” in the left-hand menu and open the “Duplicare Administration” app.
Once you start the Duplicare Administration app, you will be able to access the configuration pages for each area of the solution from the left side menu. The first page you should go to is the Authentication page.
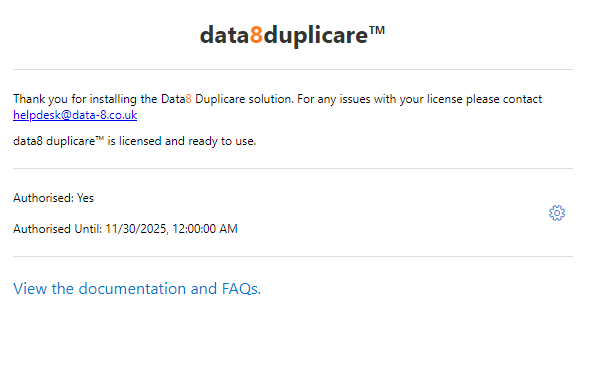
Duplicare will automatically obtain a license from Data8. Information will be displayed on based on your license and if a license could be found. If you do feel it is incorrect, please get in touch with your Data8 account manager. If you do not see “data8 duplicare™ is licensed and ready to use“, please refer to our FAQs with the error code on screen.
Once you see “data8 duplicare™ is licensed and ready to use”, your installation is set up and you are ready to customise the product to satisfy your business needs. This can be done by clicking on the settings cog.
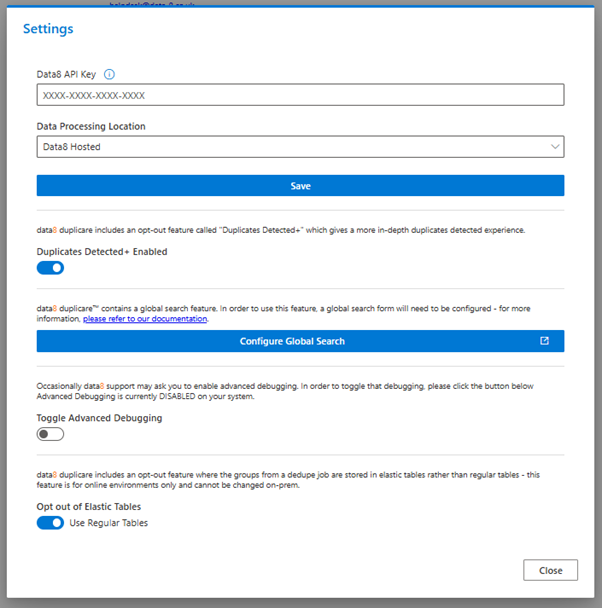
After clicking the settings cog, the dialog above will appear. This is where the additional features of Duplicare can be managed.
Data8 API Key:
To use address standardization within Duplicare, you will need to enter a valid server side Data8 API key which can be created in the Data8 portal.
Data Processing Location:
Use this to control where in the world your data will be processed. By default, all external data processing will be handled in the Data8 data centres, please contact your account manager to enable additional options.
Duplicates Detected+:
Please refer to the “Duplicates Detected+” section of this guide for more information.
Configure Global Search:
Please refer to the “Global Search” section of this guide for more information.
Toggle Advanced Debugging:
Occasionally issues do arise, and our support team may ask you to turn advanced debugging on, which would help us diagnose any issues.
Elastic Table Opt Out:
In online installations, by default the duplicate groups associated with a dedupe job are stored in elastic tables. If you’d rather use elastic tables, you can revert this behaviour here.