Home » Resources » How-to Guides » Shopify Installation Guide
Shopify Installation Guide

Find Data8’s Shopify Installation Guide here to get started with your data validation journey. Our integration for Shopify currently contains integrations for PredictiveAddress, International Telephone Validation, Email Validation and Name Validation.
NOTE: Our integration will only work at checkout for Shopify Plus members. This is due to Shopify’s restriction on editing the checkout theme code.
Step 1: Open theme.liquid file
- Log into the admin backend site of your Shopify store.
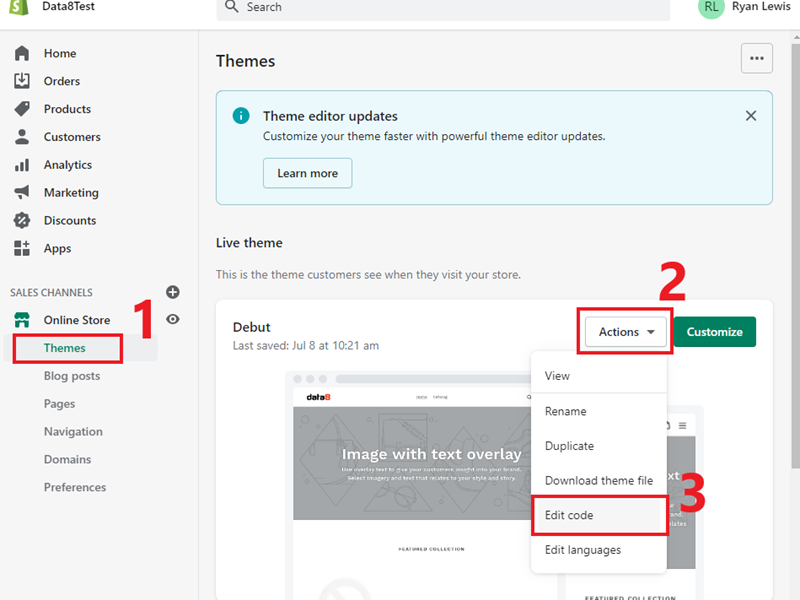
- Under ‘Online Store’ from the left side menu, click on ‘Themes’.
- For the live theme, click the ‘Actions’ dropdown and select ‘Edit Code’.
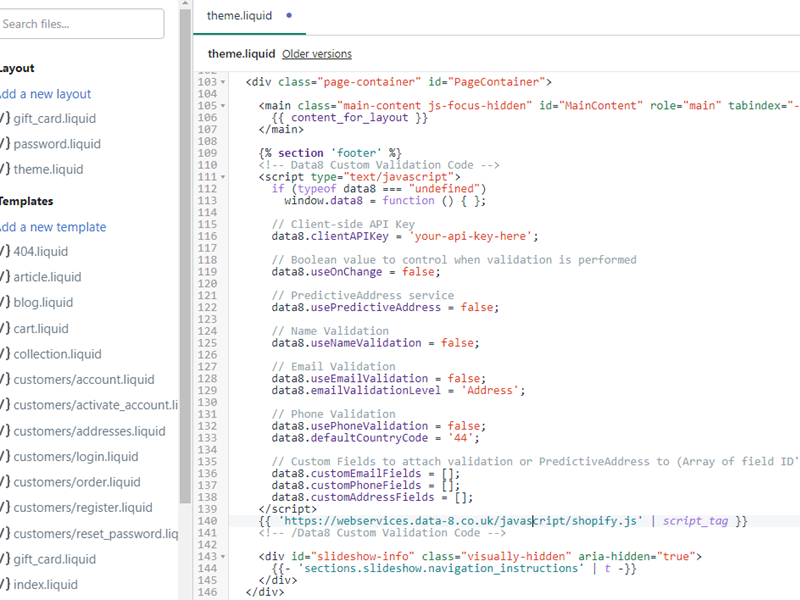
- Find the ‘theme.liquid’ file within the ‘Layout’ folder.

Step 2: Generate your configuration code using the form below
Simply fill out the form and click generate to get your custom code.
Step 3: Add code into theme file

Having generated your code above, you can now copy and paste this into your theme file.
The code should be placed immediately after the {% section ‘footer’ %} line.
Additional Configuration
To configure the validation to suit your needs, open the theme code file (theme.liquid) and change the value of the variables to suit your needs. An API key is required to use any of the validation or PredictiveAddress services. Each validation service requires the necessary credits to function.
If you are using the PredictiveAddress service, please note that the ‘county’ property of the address is often not populated in the response as it isn’t actually required by the Royal Mail and isn’t always possible to retrieve. Therefore, it is recommended that you either remove the county field from your forms, or make sure the county field is not required.
PredictiveAddress Options
When the PredictiveAddress service is enabled, the PredictiveAddress Options box will become visible. This box can be left blank to use the default configuration of PredictiveAddress. However, should you wish to customise your integration, you can do so by entering any combination of the options available for the PredictiveAddress service.
For example, enter the following into the PredictiveAddress options box to detect the initial country in the PredictiveAddress search, from the users IP address:
initialCountry: "auto"
PredictiveAddress & ///what3words
You can search for any 3 word address by simply typing out the three words like so “pitch.tells.civil”.
If you wish to store the 3 word address that was used to retrieve the final address, add the class data8_what3words to an input field to indicate where we should store the what3words address.
If you wish to use what3words to get a more precise latitude and longitude, you will need to pass in the options:
includeLocation: true
includeWhat3Words: true
and then add the classes: data8_latitude and data8_longitude to some text inputs to indicate where to store the returned data.
Custom Address Fields
Custom address fields can be entered by enabling the ‘useCustomFields’ option in the form above, which adds the data8.customAddressFields = []; setting to the configuration. Field id’s for custom address fields can be added in the following format. (Only ‘line1’ and ‘postcode’ are required):
[
        { element: 'company_FieldId', field: 'organisation' },
        { element: 'street_1_FieldId', field: 'line1' },
        { element: 'street_2_FieldId', field: 'line2' },
        { element: 'city_FieldId', field: 'town' },
        { element: 'region_FieldId', field: 'county' },
        { element: 'zip_FieldId', field: 'postcode' },
        { element: 'country_FieldId', field: 'country' }
];
Usage
After setting up the options to suit your needs, the relevant enhanced data capture and validation will be applied to the appropriate fields on data-entry points around your site. The standard name, email, telephone and address fields will be validated accordingly. Custom/extra fields can be added to the configuration through the ‘custom_..’ variables in the settings.
The following rules can be used to attach Data8 Validation to acceptable fields:
- Email: Either a field name attribute containing
emailor a text input of typeemail, or an id attribute listed indata8.customEmailFields. - Telephone: Either a field name attribute containing
phoneor a text input of typetel, or an id attribute listed indata8.customPhoneFields. - Name: A field name attribute containing
name(excludingusernameandcompany name) or an id attribute listed indata8.customNameFields. - Address (PredictiveAddress and Postcode Lookup): Standard address fields, or address fields specified in the custom address fields setting.
