Phone Validation Settings
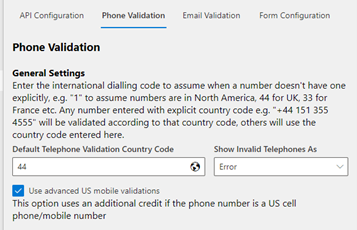
Telephone numbers are validated according to different rules for different countries. If a telephone number contains a full international code, the country will be determined from the number itself. If no international dialing code is specified, the country entered in the Default Telephone Validation Country Code setting is assumed. This defaults to 44. If you are outside of the UK you will want to change this to the international dialing code from your country (e.g. 1 for US, 33 for France etc.) so that telephone numbers are validated according to the rules for the correct country.
Once your global settings are set up, you need to configure column by column mappings to store the validation results.
Phone Validation Setup
From this page, select the table name you wish to configure (i.e. Contact) and click “Add”. This will open a new popup.

By default, you will have no mappings, so you’ll need to add a new mapping. This is defined like so:
Source Field: The source column of the telephone number you wish to validate.
Target Field: The column in which you wish to store the validation result in. This field needs to be a “choice” synced with the global choice named called “Telephone Validation Status”. Alternatively, you can select “Create a new field” and allow the page to create the field for you.
Last Validated: This is an optional column for you to store when the phone number was validated to keep your data quality up to date. Alternatively, you can select “Create a new field” and allow the page to create the field for you. Whilst this is optional, we recommend you use it to get most of the solution.
Once you have selected your values, click “Save” before repeating for all other phone fields. Each time you “Save”, the mapping will move to “Existing Mappings”.