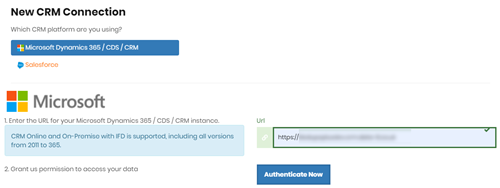
We are always looking to ensure we are using the best methods to keep your data safe, and as part of that effort I’m pleased to announce that you can now use the modern OAuth authentication methods for on-premise Microsoft Dynamics CRM / 365 instances that we connect to for duplicare, TPS checking or other bespoke data cleansing processes.
If you’re using an online version of Microsoft Dynamics 365 you’ve already been able to use OAuth for some time, but today we’ve extended it to include on-premise systems using an Internet Facing Deployment (IFD) configuration as well.
What’s the difference?
Without OAuth you need to give us a username and password to authenticate. This works perfectly well, but does mean that we have to store a password that could be used to log into the same account elsewhere.
Using OAuth eliminates this risk – instead of storing a password we get a token that gives us access to CRM and nothing else. This immediately reduces the scope of any potential security issues.
Because of this improvement, OAuth is the recommended way of connecting to Microsoft Dynamics 365, and going forward will be the only supported way. Although we will continue to support using a username and password for the time being, we will be looking to have all our users move over to OAuth over the coming months.
How do we set it up?
If you’re running Microsoft Dynamics 365 / CRM on-premise and have configured the IFD settings, the good news is that you’ve already done the hard work. Enabling OAuth just involves running two more Powershell scripts. Microsoft includes some information on these steps in their post-installation and configuration guidelines, but the short version is:
On the Microsoft Dynamics 365 / CRM Application Server
Open Powershell as an administrator and run:
					Add-PSSnapin Microsoft.Crm.PowerShell
$ClaimsSettings = Get-CrmSetting -SettingType OAuthClaimsSettings
$ClaimsSettings.Enabled = $true
Set-CrmSetting -Setting $ClaimsSettings
This enables OAuth to be used with your Microsoft Dynamics server, but doesn’t allow the Data8 application to authenticate to it just yet. For that you need to move on to the second stage:
On the AD FS server
Open Powershell as an administrator and run:
Add-AdfsClient -ClientId 2efaa9c6-d340-4bf9-a923-f718d934ad87 -Name "Data8 CRM Connection" -RedirectUri https://www.data-8.co.uk/dashboard/authenticatemscrmcallback
Once you’ve run these scripts to get your setup ready for OAuth, you can use our website to configure a connection to your system.
Go to the list of CRM Connections within your dashboard and click the Add button at the bottom.
On this page, enter the full URL of your IFD instance and click the Authenticate Now button.

This shows the second script from above again. If you’ve already run it you don’t need to do so again, click the Authenticate Now button again and you’ll be redirected to your normal CRM login screen. Logging in here will give us access to your CRM database as the user you log in as, so if you want us to use a different user account from your personal one make sure you log in as that now. If you’re already logged in to CRM you may not be prompted to log in again.
After you have completed the login process you will be sent back to the list of CRM connections where you should now see your new connection ready to use, all without entering a username or password into our website!
Troubleshooting
If you get the message “An error occurred. Contact your administrator for more information” instead of the CRM login screen, this indicates a problem with the AD FS configuration step. Please ensure the second script listed above has been run successfully, including the correct ClientId and RedirectUrl parameters.
