Home » Resources » How-to Guides » Dataverse & Dynamics 365 Installation Guide » Duplicare Hub » Duplicare Installation Guide » Duplicare Dedupe+ Job
Duplicare: Dedupe+ Jobs
Dedupe+ jobs are a way of taking a dedupe+ rule and applying it across either all rows or a defined subset to locate and solve duplicates in batch.
Creating a dedupe+ Job
Dedupe+ Jobs are stored as rows in the dedupe+ jobs table and by saving a new row, it will communicate with the Data8 servers and process the job accordingly.

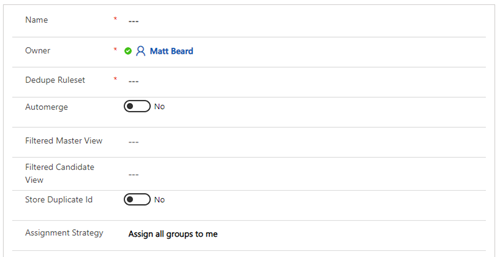
When creating a new dedupe+, the following options are available.
Name:
This is a friendly name for your reference only.
Owner:
This is the owner of the job, again for your reference only.
Dedupe Ruleset:
This is a lookup to the rule set you would like to run against the data.
Automerge:
This is a yes/no option where you can enable the results to be automatically merged. This defaults to “No” and should only be set to “Yes” once you are fully happy with your Dedupe+ and Merge+ rules. If you are running a job with Automerge enabled, we would always recommend creating a back up before as we will not be able to revert our changes.
Run Merge Async: (Online Only)
This option will allow an automerge job to run all it’s merges asynchronously as system jobs. Your job complete much quicker and the merges will continue to run behind the scenes. Note – you not be alerted to any failed merges.
Filtered Master View:
Duplicare defines a master as the pot in which duplicates will be looked for. This enables you to reduce that pot so you will only look for duplicates within a subset – for example you only want to find duplicates within your “Active Contacts”. The drop-down box for Filtered Master View is populated by both system views and your user views. If left blank, it will use all rows.
Filtered Candidate View:
Duplicare defines a candidate as the pot of rows which we would like to see is duplicates. This enables you to reduce that pot – for example find duplicates of “Leads created on last 24 hours”. The drop-down box for Filtered Candidate View is populated by both system views and your user views. . If left blank, it will use all rows.
Store Duplicate ID:
This is optional and defaults to “No”. If you select “Yes”, the results of the dedupe+ will populate the column you select in the “Store Duplicate ID Override Field” column, enabling to you to perform analysis in a data tool of your choice. Setting this to “Yes” will slow the job down as duplicare will have to apply an update to all affected rows – it will also affect the modifiedon values of those rows.
Store Duplicate ID Override Field:
By default, the duplicate ID will be stored in the “Duplicate Detected ID” column however you can change this option by selecting it here.
Assignment Strategy:
Once the Dedupe+ Job is complete and groups of duplicates have been identified, one or more people will need to work through those groups to merge the rows. If you have many duplicates and need to split this work across multiple people, use this setting to have the groups automatically assigned to the relevant users for review. If you select “Assign groups across a team” then another option will appear.
Assignment Team:
This will only appear if you have selected “Assign groups across a team” and it allows you to select the team in charge of handling the duplicate groups.
Once you press save, it will save the row with a default status reason of “Pending”. It can take out system up to 5 minutes to pick up the job and you will know we have picked it up as the status will have updated to “Processing”.
Processing the results
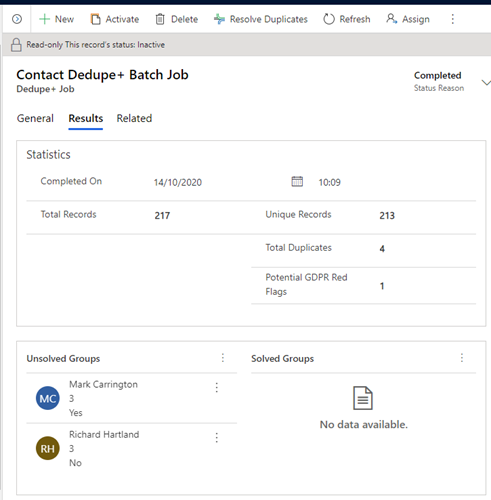
Once the job is complete, the status will change to “Completed” and if you open the Dedupe+ job row, you will now see a new “Results” tab is visible.

Within this results tab, you have some statistics and some groupings of duplicates. The top line figures are for your reference and will help you understand the level of duplicates you have within your data. Additionally, the “Potential GDPR Red Flags” count you see is to highlight a group of duplicates that contains a conflict of consent i.e. 1 row is “Allow” emails and one is “Do Not Allow”. This only refers to the out of the box marketing permission columns and at this time cannot be customised.
As well as the statistics, duplicare will have imported “groups”. A group is 2 or more rows we think are duplicated and it’s your job to work through those groups and select if it is a duplicate or not and apply that merge. You have 2 options here:
- Pick a specific group from the bottom grid and by double clicking it, it will open the merging window.
- Select “Resolve Duplicates” on the top ribbon. This will open the very first group and will enable you to work through each group one by one and make your decisions.
Once you have decided on each groups, you will see that group has moved to “Solved Groups” with a status reason.
When you are merging rows, you will see a slightly different set of buttons at the bottom of the screen which looks like this.

Here you can see how many groups you have remaining, and you can either commit the merge or decide that those rows should not be duplicates.
Merge & Next
This will commit the merge and load the next duplicate group
Skip
This will put this group to the back of the pile for you to make your decision later.
Ignore
This will close this group as a non-duplicate. It will also give you the option to “Would you also like to create all exclusion rules for this group?”.
If you click “OK”, you will not be told about these potential duplicates moving forward.
Dedupe+ Job Schedules
You are able to schedule dedupe+ jobs to automatically be generated in order to keep on top of duplicates within your system.
As with all of the duplicare solution, dedupe+ job schedules are stored within a table and can be access through the usual ways, including the duplicare administration app.

To create a new schedule, simply add a new row to this table.

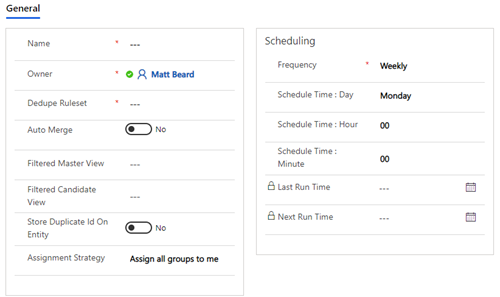
The left-hand section of a dedupe+ job schedule is the same as a standard dedupe+ job and these are the settings that will be copied onto the dedupe+ job when it is automatically generated.
The scheduling section is where you configure the schedule and how often you wish it to run. By populated all these columns and leaving the schedule active you will automatically see the dedupe+ jobs appear.
Please note that all configuration done on this page should be done in the UTC timezone.
Failed Schedules
If a schedule fails to create a job for any reason, the “Status Reason” of the schedule will change to “Paused Due To Error” and the details of the error will be shown in a message bar at the top of the screen.
After resolving the cause of the error, click the “Clear Error” button in the ribbon. The schedule will then resume running jobs shortly. If you want to force it to run another job quicker because jobs have been missed while the schedule has been paused, update the “Next Run Time” field to the current date & time.
It is also possible for schedules to stop running without displaying an error if our connection to your Dynamics 365 instance fails, e.g. due to missing permissions or invalid authentication details. In this case, please try reauthenticating your connection.
