Home » Resources » How-to Guides » Dataverse & Dynamics 365 Installation Guide » Email and Telephone Validation Hub » Email and Telephone Validation Installation Guide » Email and Telephone Validation Configuring Email Validation
Email and Telephone Validation: Configuring Email Validation
Email Validation Settings
Email addresses are validated to the level specified on this page:
- Syntax ensures only that the email address is in the correct format. This is the fastest level of validation but will allow through the most invalid email addresses.
- Domain ensures that the domain name (to the right of the @ sign) is valid and is configured to accept email. This is normally the best level in terms of speed and accuracy.
- Server ensures that there is an email server currently live and ready to accept email for the domain. This will eliminate dormant domains but increases the time required to perform the validation.
- Address ensures the mail server accepts email for the exact mailbox. This is the most precise level of validation but does have a false positive rate, especially for consumer email addresses.

With the Suggest Email Address Corrections box checked, misspelt email addresses could be correctly automatically.
Email Validation Setup
From this page, select the table name you wish to configure (i.e. Contact) and click “Add”. This will redirect you.

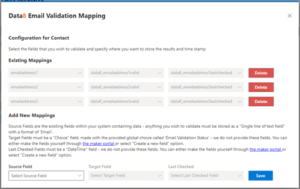
By default, you will have no mappings, so you’ll need to add a new mapping. This is defined like so:
Source Field: The source column of the email address you wish to validate.
Target Field: The column in which you wish to store the validation result in. This field needs to be a “choice” synced with the global choice named called “Email Validation Status”. Alternatively, you can select “Create a new field” and allow the page to create the field for you.
Last Validated: This is an optional column for you to store when the email address was validated to keep your data quality up to date. Alternatively, you can select “Create a new field” and allow the page to create the field for you. Whilst this is optional, we recommend you use it to get most of the solution.
Once you have selected your values, click “Save” before repeating for all other phone fields. Each time you “Save”, the mapping will move to “Existing Mappings”.
