Configuring Predictive Address – Global
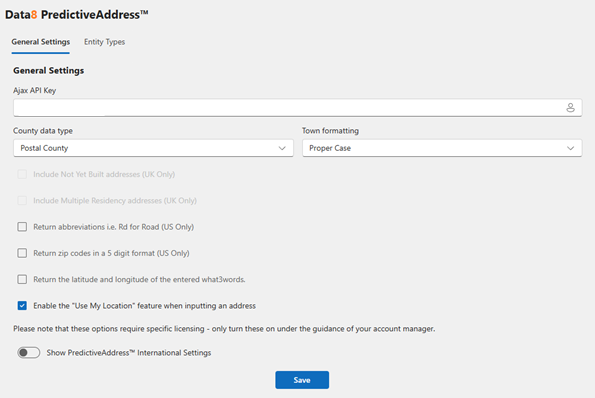
The main tab of the configuration page allows for a multitude of global options to be set. Please refer to the Data website for specific detail on them all.
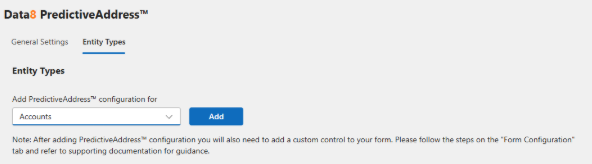
You now need to set up specific configurations for each address grouping.
Note: If you installed the solution from AppSource, these configuration entries will already be added for all standard address fields. You may still need to complete the steps outlined in the “Form customization” section below
Configuring Address Specific Predictive Address
To add the PredictiveAddress functionality to a form, select the type of entity (e.g. Account) that you want to add it to, then click Add.
If you are adding postcode lookup to an entity that has standard address fields (Street 1, Street 2, Street 3, City, State/Province and Zip/Postal code), the configuration wizard can do a lot of the configuration for you. You will be shown the screen below, with the Quick Configuration drop down list containing the names of the address blocks in the entity. Select the one you want to add postcode lookup functionality to and click Configure.
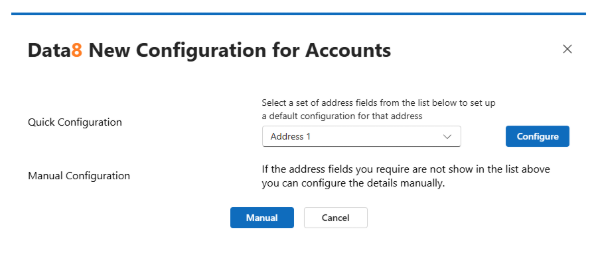
Using quick configuration, if there is an associated Name field, e.g. Address 1: Name, this will be used to hold any company name included in an address. Otherwise, any company name will be ignored. If this is not the desired behaviour, you can continue to use the quick configuration wizard, but you will then need to click on the Configure link next to the entity type on the main configuration screen to edit the configuration manually.
Advanced Manual Configuration of Predictive Address
If you want to add PredictiveAddress functionality to some other fields, click the Manual button and you will be able to select what fields to use to store the address details in. If no standard blocks of address fields can be found by the wizard, this step will be skipped, and you will be taken straight to the manual configuration screen.

You can now set up what fields the address details should be placed in. For example, on an account screen you may want the company name to go into the Account Name field, while the address goes into address 1-3, city and state fields, with the postcode in the zip code field.
Note that the fields for the address have been added in order, and the “Keep town and county in last two fields” box has been checked – we generally recommend this approach, particularly for UK addresses.
When you are happy with the layout of your address fields, click “Save” at the bottom of the page
You may alternatively choose to treat the organisation name as a normal part of the address, in which case any organisation name will be placed in the first address line and the other address details will be moved as appropriate, or you can choose to ignore it, in which case any organisation details will be lost.
The “Advanced Address Settings” section can be left as it is unless we advise you otherwise as this is calculated automatically by the “fields” section configured above. However, some fields which may be of interest in here are the “Latitude” and “Longitude” fields, and the “Last Update” field.
Repeat this process for any other addresses you want to add PredictiveAddress functionality to.